Groin, Calf and Thigh (Quadriceps) strains
Causes of these strains are the same. All three cases result from a lack of warm up, resulting in muscle stiffness. When tackling, running, jumping, sprinting and kicking, there is a risk of overstretching the muscles causing the muscle strain. Another possible reason is that there is excessive pressure on the muscle, causing a strain. Next, overuse of the muscle can lead to muscle fatigue, resulting in the muscle being unable to absorb forces, causing strains.
Causes of these strains are the same. All three cases result from a lack of warm up, resulting in muscle stiffness. When tackling, running, jumping, sprinting and kicking, there is a risk of overstretching the muscles causing the muscle strain. Another possible reason is that there is excessive pressure on the muscle, causing a strain. Next, overuse of the muscle can lead to muscle fatigue, resulting in the muscle being unable to absorb forces, causing strains.
Calf strains- The calf consists of 3 major muscles, 2 gastrocnemius muscles and 1 soleus muscle. The calf muscles are the muscles from the back of the knee all the way to the Achilles. The function of the calf is to push the leg forward when walking, jumping or running. Basically a calf strain is where one or more of the muscles are overstretched or damaged. There are 3 grades of calf strains. A grade 1 strain is where a few muscle fibres are damaged or there is a microscopic tear to the muscle. There is mild pain, but no limits to the activity. A grade 2 strain is where many muscle fibres are damaged, and there is discomfort to walking and activity is limited. A grade 3 strain is where the muscle is completely ruptured, and extreme pain is felt. The player cannot walk.
Symptoms of Calf strain
1) Bruising
2) Swelling
3) Inability to bear weight on calf
4) Stiffness
5) Awkward appearance
Symptoms of Calf strain
1) Bruising
2) Swelling
3) Inability to bear weight on calf
4) Stiffness
5) Awkward appearance
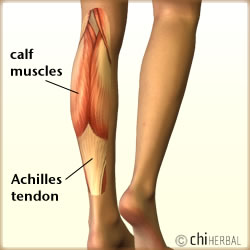
Pain behind knee information. (N.D.). [Anatomy of calf]. Retrieved from http://painbehindkneecure.com/wp-content/uploads/2013/06/calf-pull-muscle.jpg
Treatment
Use R.I.C.E. method, rest, ice, compression and elevation. Even if it is only the slightest discomfort, always seek rest first. If bruising and swelling appears, always apply ice to reduce bruising and swelling. Apply ice packs for 20 minutes 3 times a day. Direct skin contact with ice may result in frost bite. Use a compression band on the injured calf to reduce swelling and bruising. Elevate the leg as much as possible (best above the heart), for the same function as icing and compressing, to reduce swelling and bruising.
Calf stretches
1) Gastrocnemius stretch. Stand facing the wall and put both hands on the wall, leaning towards it. Stretch the injured leg out, while the other leg is kept in. Both the feet should point towards the wall and the whole foot must be in contact with the ground. The knee of the injured foot is kept straight. Feel the stretch on the calf and hold 30 seconds. Do 2 sets of 10 reps, 3 times a day.
2) Stand facing the wall and put both hands on the wall, leaning towards it. The injured foot should be behind the other foot with both feet pointing towards the wall. While ensuring that the whole of both feet is in contact with the floor, slowly bend your back knee until you feel a heel stretch in the back leg.
3) Sit down on the floor or on a chair. Sit straight with the legs straightened. Use a towel and loop it over the ball of the foot, and holding the 2 ends of the towel, pull it back. Feel the stretch on the calf. Hold it there for 15 seconds and repeat 3 times. Do the exercise thrice per day.
4) Find a stair step, a sturdy stool or curb. Stand at the edge of the ledge with the other feet gently stepping beside. The hands should be holding onto support. Transfer the weight of the body on the leg to be stretched, and keeping the toes on the ledge, move the heel down until a stretch is felt on the calf. Hold for 15 seconds and repeat 3 times. Do the stretch thrice per day.

kritiostodd. (July 6, 2009). [The bruise as it first appears, 3 days after the injury]. Retrieved from http://kritiostodd.wordpress.com/2009/07/06/survey-says/
Groin strain
The Groin consists of six muscles, spanning from the inner pelvis to the inner thigh bone). These muscles pull the legs together, and are responsible for adduction, a movement which moves the leg towards the midline of body. It also help with other movements of the hip joint, whose function is to pull the leg back and move the leg from an outside to an inside position. During sprinting, dribbling and tackling, the groin is most likely to be overstretched, causing a strain. There are 3 grades of groin strains. A grade 1 strain is where very few muscle fibres are torn, and the player will feel very slight discomfort at the groin area, without limiting his activity. A grade 2 strain is where a large amount of muscle fibres are damaged, causing pain, limiting the player’s movement and activity. A grade 3 strain is a complete rupture of the muscle, causing extreme pain, and rendering the player unable to walk.
Symptoms
1) Popping sensation at the moment when injury is sustained
2) Pain and tenderness at groin area
3) Pain when legs are brought together
4) Swelling
5) Bruising
6) Loss of leg strength when moving in certain ways
7) Tightness
8) Muscle spasm (grade 3)
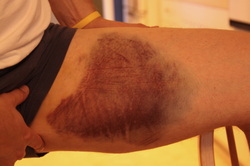
kritiostodd. (July 6, 2009). [The bruise as it first appears, 3 days after the injury]. Retrieved from http://kritiostodd.wordpress.com/2009/07/06/survey-says/
Treatment
Use R.I.C.E. method, rest, ice, compression and elevation. Even if it is only the slightest discomfort, always seek rest first. If bruising and swelling appears, always apply ice to reduce bruising and swelling. Apply ice packs for 20 minutes 3 times a day. Direct skin contact with ice may result in frost bite. Use a compression band on the injured groin to reduce swelling and bruising. Elevate the leg as much as possible (best above the heart), for the same function as icing and compressing, to reduce swelling and bruising. It is difficult to elevate the groin. When sleeping, one can put a pillow at his pelvis area, to help with elevation as much as possible.
Use heat therapy in the form of heat packs on the injured area before starting any activities. Heating helps to loosen the muscle tissues and help it relax, as well as to stimulate blood flow, which will quicken the healing process. However, do not use heat therapy in the first 3 days of sustaining the injury.
1) Standing groin stretch. First, stand with both legs apart. Then, shift your whole body to your right leg, and transfer your weight to that leg. Bend to the right until you feel the stretch on the left groin. Hold for 20 seconds, before doing the same for the other leg. Repeat 3 times per set, and do 3 sets per day.
2) Butterfly. First sit down. Bend your knees and put the soles of both feet together. During the exercise, the soles of the feet should be in complete contact. Use your hand to hold onto the feet. Then, push both feet as near as possible to the groin, and allow your legs to fall towards the ground. The back should be kept straight at all times. Hold for 15 seconds. Repeat for 3 times, and do the exercise thrice per day.
3) Squatting Groin Stretch. First, stand with your feet wide apart. Then, slowly squat down until your knees bend to 90 degrees. Use your hands to push tour thigh outwards, until you feel a stretch at the groin. Hold for 20 seconds. Repeat 3 times per set and do 3 sets per day.
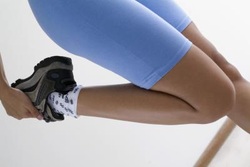
Lee Simmons. (Nov 17, 2010). [Quadriceps stretch]. Retrieved http://www.livestrong.com/article/309718-the-effects-of-running-on-a-quadriceps-tendon/
Quadriceps strain (Quad Strain)
The quadriceps consists of 4 muscles in the front of the thigh. They work with the hamstring to extend and bend the leg. The Quadriceps is involved in kicking, jumping and running. Other than the causes mentioned above, muscle imbalance (a much stronger hamstring) also tend to increase the risk of a Quad strain. There are 3 grades of Quad strains. A grade 1 strain is where very few muscle fibres are torn, and the player will feel very slight discomfort at the thigh, without limiting his activity. A grade 2 strain is where a large amount of muscle fibres are damaged, causing pain, limiting the player’s movement and activity. A grade 3 strain is a complete rupture of the muscle, causing extreme pain, and rendering the player unable to walk.
Symptoms
1) Pain when extending or bending leg
2) Swelling
3) Bruising
4) Difficult to walk
5) Popping sensation when injury is sustained
6) Tenderness at the Quads
Treatment
Use R.I.C.E. method, rest, ice, compression and elevation. Even if it is only the slightest discomfort, always seek rest first. If bruising and swelling appears, always apply ice to reduce bruising and swelling. Apply ice packs for 20 minutes 3 times a day. Direct skin contact with ice may result in frost bite. Use a compression band on the injured Quadriceps to reduce swelling and bruising. Elevate the leg as much as possible (best above the heart), for the same function as icing and compressing, to reduce swelling and bruising.
Use heat therapy in the form of heat packs on the injured area before starting any activities. Heating helps to loosen the muscle tissues and help it relax, as well as to stimulate blood flow, which will quicken the healing process. However, do not use heat therapy in the first 3 days of sustaining the injury.
Exercise
1) Stand on your left leg with the right leg bent backwards and use your right hand to hold onto your right leg. Slowly pull the right leg back towards the buttocks, until a stretch can be felt. Alternatively, you can stand on you left leg with your right leg bent backwards, but instead use you left hand to hold you right leg. Repeat with the other leg and hold for 20 seconds. Grab onto a steady object for balance. Do this exercise 3 times per set, and do 3 set per day.
2) Lie face down on your belly. Use a rope/exercise band and wrap it around one of your kegs. Hold the other end of the rope/exercise band with both hands and slowly pull forward, until a stretch in the Quad is felt. Repeat for the other leg and hold for 20 seconds. Do this exercise 3 times per set, and do 3 set per day.
