Patellar tendinopathy (pain in the knee)
Another name for patellar tendinopathy is called jumper’s knee. This is because people who jump a lot have very high chances of sustaining this injury. However, it does not mean that only jumpers have to beware, as many sportsmen also suffer from this injury.
Patellar tendinopathy is the inflammation (tendinitis) or tearing (tendinosis) of the patellar tendon, which connects the kneecap to the shinbone. The patellar tendon is located below the kneecap. It helps the leg extend the knee and is involved in many leg movements.
There are 4 grades of patellar tendinopathy. Grade 1 is where the player only experiences pain in the knee after activity. Grade 2 is where the player experiences pain before and after activity, and performance is not affected. Grade 3 is where the player experiences pain before, during and after the activity, and performance is affected. Grade 4 is where the tendon completely ruptures, causing extreme pain to the knee which limits activity.
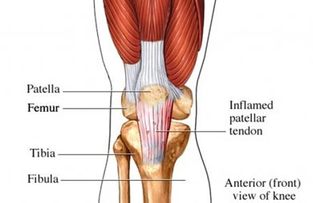
Michelle Badash. (N.D.). [Patellar tendinopathy]. Retrieved from http://www.lifescript.com/health/centers/pain/related_conditions/patellar_tendinopathy.aspx
Cause
1) Overuse
2) Sudden change in frequency and intensity of exercise. E.g. Training 4 times a week from the usual 2, or a 4 hour training session from the usual 2 hours.
3) Muscle imbalance. Muscle imbalance will cause the patellar tendon to experience greater strain, causing patellar tendinopathy
4) Jumping and landing
5) Sudden acceleration and deceleration
6) Sudden changes in direction
7) Playing on hard surfaces
Symptoms
1) Pain below kneecap
2) Swelling
3) Pain in the knee during sports
4) Stiffness
5) Pain when bending and straightening knee
6) Weakness in leg or calf
7) Tenderness
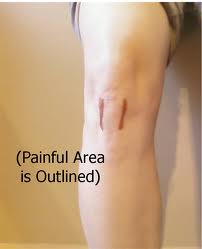
Burlington Sports Therapy. (June 23, 2013). [patellar tendinitis, painful area]. Retrieved from http://burlingtonsportstherapy.com/tag/tendinopathy/
Treatment
1) Rest. As patellar tendinopathy result from overuse, rest is essential to healing the inflammation or microscopic tear. Rest until symptoms disappear. In the meantime, the player can participate in gentle activities like swimming and riding a stationary bicycle to keep active. Never ever play through the pain. Many athletes play through pain as they think that it is a minor injury. However, this can lead to the injury worsening.
2) Ice. Ice the knee when swelling occurs or when there is pain. Icing will relief pain and help to reduce swelling. Ice for 20 minutes for 3 times per day using icepacks. Direct contact with the skin will lead to frost bite.
3) Wear a knee support or strap below the knee cap to provide support and stability of the knee, reducing pressure on the knee, minimizing chances of further damage to the tendon.
4) Elevation. When the knee is in pain or when swelling, elevate the leg (best above heart level) to reduce swelling and relief pain.
Stretching exercise
1) Stand on your left leg with the right leg bent backwards and use your right hand to hold onto your right leg. Slowly pull the right leg back towards the buttocks, until a stretch can be felt. Alternatively, you can stand on you left leg with your right leg bent backwards, but instead use you left hand to hold you right leg. Repeat with the other leg and hold for 20 seconds.
2) Find a low lying object like a stool or a step. Put the injured leg on the object, with the heels in contact the object. Make sure that the knees are always straight during the stretch. Slowly bend the uninjured leg, and lean forward towards the injured leg with, keeping the back straight, until a stretch can be felt at the hamstring. Then, repeat with the other leg. Hold for 15 seconds and do 3 sets 3 times a day.
3) Gastrocnemius stretch. Stand facing the wall and put both hands on the wall, leaning towards it. Stretch the injured leg out, while the other leg is kept in. Both the feet should point towards the wall and the whole foot must be in contact with the ground. The knee of the injured foot is kept straight. Feel the stretch on the calf and hold 30 seconds. Do 2 sets of 10 reps, 3 times a day.
4) Stand facing the wall and put both hands on the wall, leaning towards it. The injured foot should be behind the other foot with both feet pointing towards the wall. While ensuring that the whole of both feet is in contact with the floor, slowly bend your back knee until you feel a heel stretch in the back leg. Do 2 sets of 10 reps, 3 times a day.
5) This stretch has to be done on a mat or cushion. Put the injured knee on the floor, and extend the other leg out, ensuring that it is bending 90 degrees. Then, the whole body should lean forward with the back straight, and a stretch should be felt at the hips. Do 2 sets of 10 reps, 3 times a day.
6) Single leg squat. Stand upright on the injured leg. Bent the uninjured leg and ensure that it is not in contact with the ground. Bent the injured leg slowly as much as you can. Repeat with the other leg for 5 times, and do 3 sets per day.
Pvelitetrainer. (May 3, 2010). Jumper's knee exercises. Retrieved, May 19 2013, from http://www.youtube.com/watch?v=jHNqaPrCpvY
